The quickest and cheapest way to give a room a makeover, a new look, is to replace dated ceramic floor with new tile. Tiles today comes in such a plethora of shapes, colors, textures, and varieties in general, that walking into a well stocked tile shop will blow most homeowners’ minds.
Updating and Replacing Tiled Flooring in Northern Virginia
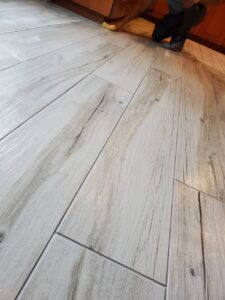
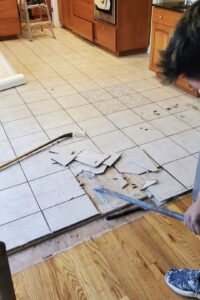
Recently, RIBA removed a dated 1980s tile and replaced it with a newer modern wood-look tile. The makeover was brilliant and extremely inexpensive and took 3 days, start-to-finish. About 5-6 hrs each day.
The 3/4 inch thick plywood was previously installed onto the home’s 1/2 plywood subfloor, giving us a total of 1.25 inches of rigid base to safely install the new ceramic tile. Without a rigid base support, the floor could otherwise flex and move resulting in cracked tile over time. Normally, we install 1/2 inch fiber cement board on top of the home’s 1/2 inch thick subfloor, and this fiber cement board gives us the rigidity we need for proper installation. Preparation of the flooring in this way only takes a few hrs for a 200-300 sq ft kitchen.
Why Proper Subfloor Preparation is so Important for Tile
Normally, if not for the 3/4 inch plywood, we would have installed 1/2 inch thick fiber cement board. RIBA uses both the Hardiebacker and Durock fiber cement products on all jobs where an adequate subfloor is not in place.
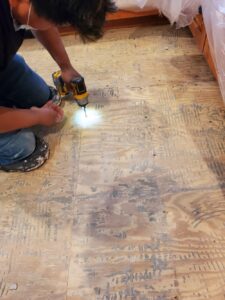
Before installation of tile we “pin” the existing plywood floor down onto the subfloor and onto the house joists.
This further ensures there is no movement underneath the tile. This takes a little time, but the added security of a proper installation makes this time well spent. Pinning in a “must”, and when not doing it one is cutting corners on labor and proper installation.
Prevention of Tile “Popping” and Cracking After Installation
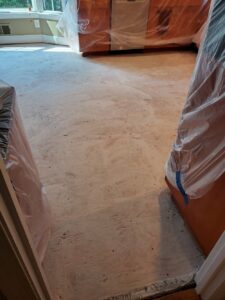
After pinning is completed, the wood subfloor needs to be treated so that the Thinset used to stick the ceramic tile down will adhere to the wood. Wood is porous and can suck too much water out of the Thinset, which can compromise the curing process and yield an unfavorable installation.
This step is imperative when applying tile to a wood substrate and skipping this step will surely have your tile “popping” up loose after a few years, or even sooner. Preparing the wood surface properly in this way take only a few hrs and is a must with installing tile onto wood. Again, normally RIBA installs ceramic onto fiber cement products such as Hardie or Durock, so this particular installation is more infrequent.
Deciding on Patterns? Mortar & Grout?
Readying the floor prior to installing tile is 90% of the tiling work!! It is the most underrated and most improperly done part of the work. If done properly, the tiled floor will see many successful years ahead of it.
After the preparation is completed, the fun and satisfying work begins. Our tilers love their work and take such pride in what they do. Daily they get to see makeovers that they did themselves and the process is very fun to see.
The Important Details When Installing Tile
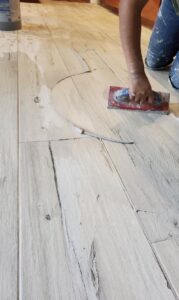
Back to tiling: Tilers will tell you that “mortar sticks and grout fills”. At this phase in our project we are using a Thinset mortar to place/stick the tile down.
Best Way to Install Patterned Tile
As we are installing a wood-look ceramic tile, our installer gets to show his artistic side by choosing a randomized pattern for the placing of the tile. Many times people will choose a pattern to lay a wood-look. We are of the opinion that a random pattern is the best option. For two reasons:
1) Patterns give the eye something to look at, something to notice.
It brings the viewers attention to the pattern. This is bad on a wood-look floor since the wood-look is filled with beautiful grain and design that is trying to show off. The last thing we want is a pattern competing with this lovely wood grain. We want the wood grain to show and stand out as much as possible.
2) A natural real wood floor is random.
It never/rarely has a pattern. We are trying to copy that look. RIBA tilers have a very planned approach. They painstakingly plan lines and do their best to optimize a random pattern without having the short sides too close together or giving a “zipper” look, which is always to be avoided. This planned layout is how experienced tilers distinguishing themselves from inexperienced tilers.
Moving on, as we place larger tile, as in this project with tiles 5ft long, we use special spacers that actually level each tile to their adjacent neighboring tiles. Larger tile is never perfectly planar, and floors are never perfectly flat. So RIBA will use leveling spacers to ensure that each tile is at an equal elevation to the adjacent neighboring tile. These spacers are more expensive and take more time, but they help to prevent bumps and curling edges at the tile intersections.

Non-Sanded vs Sanded Grout
The main difference between non-sanded and sanded grout is where you use it. Non-sanded grout is thin and is used for joints that are thin and smaller than 1/8 wide. Sanded grout is used for tile joints wider than 1/8 inches due to its thickness and strength.
Thin Set Mortar vs Adhesives
There are many types of adhesives and grouts for Tile. Adhesives need air to set, so they are good only for tiles smaller than 8.” In addition, due to the organic compounds, tile adhesives should not be used where they are exposed to water. Water will cause the mortar to degrade quickly so adhesive is not recommended for bathrooms or kitchens. Finally, unlike thin-set mortar, adhesives cannot be used as a filler or leveler so the substrate must be flat or level.
Best Tile Flooring Installation Near Me
If you are interested in hiring a general contractor with experience in tile installation, you will want to work with the best in the business and not leave it to chance.
At RIBA Construction, LLC, we are a Class A licensed contractor for residential and commercial building construction with years of expertise working on projects including the following:
- Roofing repairs and replacement
- Windows and doors
- Siding
- Decks
- Tile
- Residential/commercial construction
- And more!
If you are interested in working with us, please call (703)721-4420 to schedule your free consultation today.